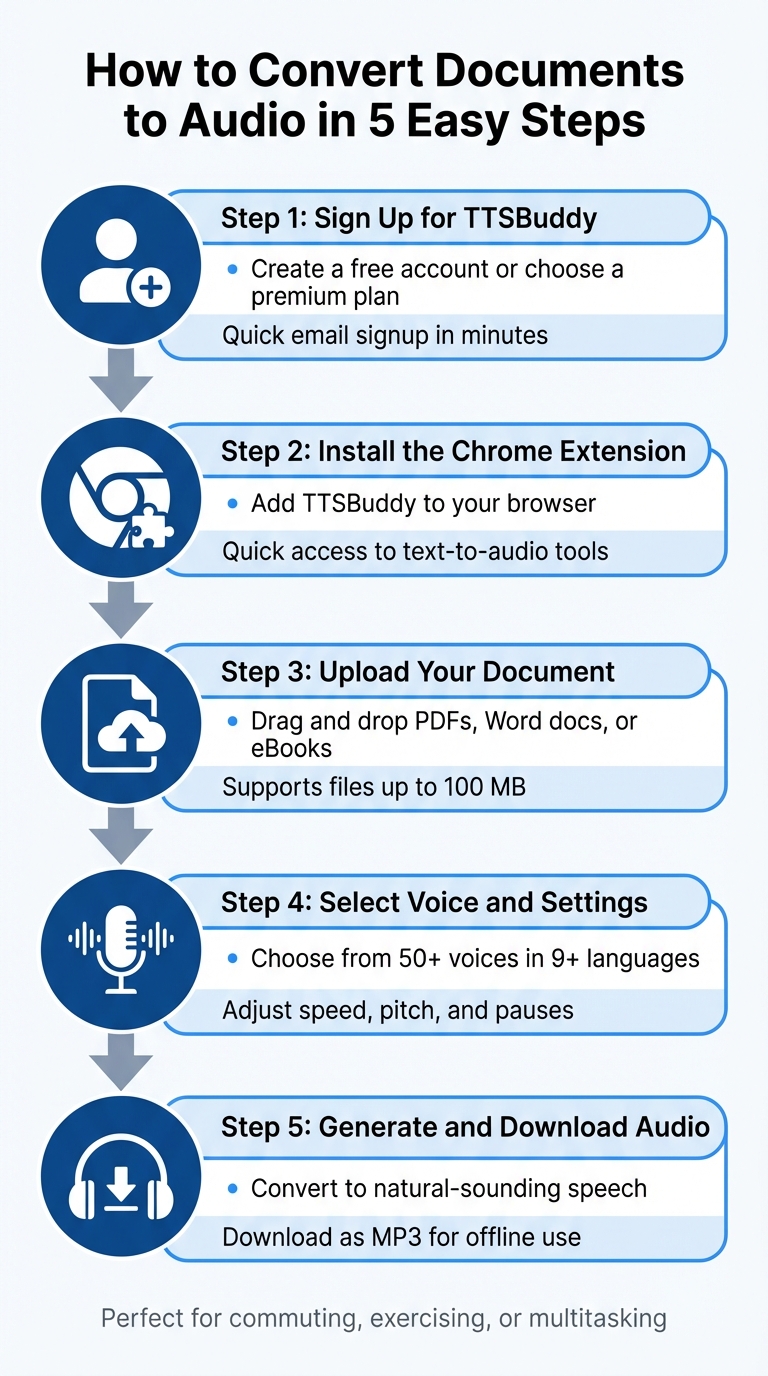
How to Convert Documents to Audio in 5 Easy Steps
Want to save time and make content easier to consume? Converting documents into audio is a simple way to listen on the go. Whether you're commuting, exercising, or managing daily tasks, turning text into speech can help you stay productive while multitasking. Here's how you can do it:
- Sign Up for TTSBuddy: Create an account for free or choose a premium plan for advanced features like MP3 downloads.
- Install the Chrome Extension: Add TTSBuddy to your browser for quick and easy access to text-to-audio tools.
- Upload Your Document: Drag and drop files like PDFs, Word docs, or eBooks directly into the platform.
- Select Voice and Settings: Choose from over 50 voice options and adjust speed, pitch, and pauses to suit your preferences.
- Generate and Download Audio: Convert your document into natural-sounding speech and download it as an MP3 file for offline use.
Why it works: TTSBuddy supports multiple file types, languages, and voices, making it a flexible tool for professionals, students, and anyone looking to reduce screen time. With features like offline playback and AI-powered text-to-speech, it's a practical solution for improving productivity and accessibility.
Ready to give it a try? Follow these steps and transform your documents into audio today.
Convert Text and Text Files to Audio Files
Step 1: Sign Up for TTSBuddy
Getting started with TTSBuddy is quick and simple. Head over to the TTSBuddy website, click the sign-up button, and create your account. All you need is your email address and a few basic details - it only takes a few minutes.
Once you're signed up, you can pick between two plans:
- Free Plan: Perfect for casual use, this plan lets you enjoy unlimited listening through the web reader or app. It includes standard voices and basic document conversion features (including PDF support), making it ideal if you're just trying out the service or have occasional needs. Keep in mind, this plan is for personal use only.
- Premium Plan: For those looking for more, the Premium Plan unlocks advanced features like MP3/WAV exports, cloud storage, audio link sharing, and seamless document-to-audio conversion. You also get access to all available voices. You can upgrade anytime through your account settings.
TTSBuddy is designed with accessibility in mind, offering a user-friendly experience for everyone.
Once your account is set up, you're ready to expand its functionality by moving on to Step 2: adding the Chrome extension.
Step 2: Install the TTSBuddy Chrome Extension
The TTSBuddy Chrome extension integrates directly into your browser, making it easy to convert documents and interact with web content without jumping between tabs.
To get started, head to the Chrome Web Store, type "TTSBuddy" in the search bar, and click "Add to Chrome." When prompted, select "Add extension" to grant the necessary permissions for reading website content and converting text to audio.
After installation, look for the puzzle piece icon near your Google search bar. Click it to open the extensions menu, locate TTSBuddy, and click the pin icon to keep it visible in your toolbar. If the extension doesn't activate automatically, you can enable it manually from the extensions menu.
Be sure to refresh any open webpages to ensure the extension works correctly.
Want to convert local PDFs or text files? Right-click the TTSBuddy icon, select "Manage Extension," and enable the "Allow access to file URLs" option. This setting allows the extension to handle documents opened in your browser alongside regular web content.
Once everything is set up, you're ready to move on to Step 3 and upload your document.
Step 3: Upload Your Document
Once you've installed the TTSBuddy Chrome extension, it's time to upload your document. TTSBuddy supports a variety of file types, including office documents, e-books, and web/text files like .docx, .pdf, .epub, .txt, and .html. Files can be up to 100 MB, and if you're working with spreadsheets, the system can process up to 500,000 rows of data.
To upload, simply click the "Upload" (or "New") button, or drag and drop your file directly into TTSBuddy. If prompted, enter your password to proceed.
For scanned PDFs or image files (like PNG, JPG, or WEBP), TTSBuddy uses AI-powered OCR to extract text in manageable chunks of six pages at a time. This ensures precision while keeping your browser running smoothly. Be sure to review the extracted text for any potential errors.
Once uploaded, TTSBuddy's document-to-conversation feature takes your content to the next level. This tool allows you to interact with your document by asking questions, requesting summaries, or having the Voice AI Assistant guide you through specific sections. It uses OpenAI-based models (tts-1 and tts-1-hd) to generate lifelike audio from your files.
After verifying your document, you're ready to move on to Step 4: Select Your Voice and Adjust Settings.
Step 4: Select Your Voice and Adjust Settings
Once you've uploaded your document in Step 3, it's time to make it sound just the way you want. TTSBuddy offers 58 voices in 10 languages, giving you plenty of options to tailor the audio to your content and preferences.
Pick a voice that fits the mood of your material. For example, a deep, authoritative tone works well for business reports, while a warm, conversational style is ideal for storytelling. Each voice in the library includes a short description, making it simple to preview and find the best match.
You can also fine-tune the playback settings:
- Speed: Use slower speeds (like 0.8x-1.0x) for detailed or complex content, and faster speeds (up to 4.5x) for material you're already familiar with.
- Pitch: Lower the pitch for a more serious tone or raise it for added energy and enthusiasm.
- Pauses: Adjust pause settings to create a natural rhythm, giving your brain time to absorb the information - especially helpful during longer listening sessions.
These adjustments are particularly useful for people with dyslexia, ADHD, or visual impairments, as they turn reading into an active listening experience that can improve comprehension and retention.
Before finalizing, preview a sample to ensure the tone and settings are just right. Once you're satisfied, move on to Step 5 to create and download your audio file.
Step 5: Create and Download Your Audio File
Now that you've fine-tuned your settings in Step 4, it's time to turn your document into audio.
Hit the "Generate Audio" button to transform your text into natural-sounding speech. The processing time will vary depending on the length of your document.
Once the audio is ready, click the download button to save it as an MP3 file (exported at 128 kbps). This format works seamlessly on smartphones, tablets, and computers.
For offline convenience, use TTSBuddy's Offline Buddy feature. After downloading, you can add the MP3 to your music library, a podcast app, or cloud storage, making it easy to listen wherever you are.
Audio files are ideal for multitasking - whether you're driving, working out, or tackling household chores. Adjust playback speed based on your needs: 1.0x-1.25x for proofreading, 1.25x-1.5x for familiar material, or 0.75x-0.85x for dense or complex content. For longer documents, consider splitting the audio into 15- to 20-minute segments with short breaks to avoid fatigue and stay focused. With these steps, your document is now ready for anytime, anywhere listening.
TTSBuddy Pricing Plans
TTSBuddy offers three plans tailored to meet the needs of casual users, professionals, and developers.
Free Plan Perfect for students or personal use, the Free Plan is entirely free. It includes 56 weekly audio hours and supports up to 250 pages for PDFs and Word files. Features include high-quality AI voices, device syncing, and adjustable playback speeds ranging from 0.5x to 4x.
Premium Plan Aimed at professionals such as lawyers, doctors, and researchers, the Premium Plan is priced at $20 per month, with a 10% discount for annual subscriptions. It provides 168 weekly audio hours, supports PDFs with up to 1,000 pages, and handles EPUBs with up to 500,000 words. Additional perks include downloadable MP3s for offline listening, faster conversion speeds (up to 5x or around 900 words per minute), and priority customer support. Plus, content processed on this plan isn't used to enhance AI models, ensuring added privacy.
API Plan Geared toward developers and organizations, the API Plan is ideal for automating large-scale text-to-speech tasks. It supports bulk processing for files up to 100 MB and can handle up to 500,000 rows of data per request. Compatible with 12 document formats, including PDF, DOCX, XLSX, PPTX, EPUB, MOBI, and TXT, it also allows customization options like choosing between standard and high-definition models, selecting voice IDs, adjusting speech speeds (1 to 4), and converting password-protected documents. This plan is marked as "coming soon".
These plans are designed to ensure you only pay for the features you need, whether you're a casual user, a professional, or a developer.
| Feature | Free Plan | Premium Plan | API Plan (Upcoming) |
|---|---|---|---|
| Monthly Cost | Free | $20 | TBA |
| Audio Limit | 56 hours/week | 168 hours/week | High-volume |
| Max PDF Pages | 250 | 1,000 | 100 MB file size |
| Max EPUB Words | 250,000 | 500,000 | 500,000 rows |
| Best For | Students & personal use | Professionals & researchers | Developers & automation |
| Key Advantage | Device syncing | Downloadable MP3s & Priority Support | Programmatic integration |
The Free Plan is ideal for light, personal use. The Premium Plan works well for professionals who need to process larger files or require offline access. Meanwhile, the API Plan is the go-to option for developers looking to automate text-to-speech tasks on a larger scale.
Common Problems and Solutions
While TTSBuddy makes converting documents to audio straightforward, some hiccups can occur. Here's how to tackle common challenges and get the most out of the tool.
File Format Errors If you're working with unsupported formats like Excel or PowerPoint, convert them to PDF, DOCX, or TXT before uploading. For scanned or image-based PDFs, TTSBuddy might not detect the text. In such cases, use Optical Character Recognition (OCR) software to turn those images into editable text.
Voice Selection Issues An empty voice list usually means your device doesn't have system voices installed or enabled. To fix this, go to your operating system's settings - like Windows Speech, macOS Spoken Content, or iOS Accessibility - and download or activate voices. If the issue persists, reload TTSBuddy after making these adjustments.
Audio Quality Challenges Documents with complex layouts (like two columns, tables, or footnotes) can lead to scrambled audio. Simplify your document by removing unnecessary elements such as page numbers, headers, or footers before uploading. If the audio sounds unnatural, try switching to a different voice or tweaking the playback speed. Research shows listening to audio can help catch errors better than silent proofreading. If problems continue, double-check your playback settings.
Playback Silence If you encounter silence during playback, start by ensuring your media volume is turned up and audio isn't being routed to another device, like Bluetooth headphones. Some browsers may require a click or tap to initiate audio playback. For platforms like Google Docs, make sure "screen reader support" is enabled in the document settings so TTSBuddy can access the text.
Complex Formatting Remedies When complex formatting prevents file uploads, copy and paste the text directly into TTSBuddy. With support for over 9 languages and 50+ voices, you can also experiment with different voices if pronunciation issues arise. For better clarity, consider expanding acronyms (e.g., replace "WHO" with "World Health Organization").
Conclusion
Convert your document into clear, natural-sounding audio in just five steps: sign up, install the Chrome extension, upload your file, choose your preferred voice and settings, and then generate and download your audio. This process eliminates the hassle of manual recording or the expense of professional studios.
TTSBuddy addresses a common productivity challenge by turning text into audio. It allows you to make the most of your time - whether you're commuting, working out, or tackling household chores. With support for multiple languages and a variety of voice options, TTSBuddy ensures the narration style matches your content perfectly.
This tool isn't just about productivity; it's also a game-changer for accessibility. Designed to assist users with visual impairments, dyslexia, or ADHD, TTSBuddy offers features like synchronized text highlighting. This combination of visual and auditory engagement aligns with Dual Coding Theory, which can improve memory retention and create a more effective learning experience.
Whether you need to breeze through lengthy reports, reduce screen-time fatigue, or make content more accessible, TTSBuddy delivers high-quality audio for seamless playback. With a free plan to get started and premium options for advanced features, it's easy to transform how you consume written content.
Discover how TTSBuddy can fit into your daily life, enhancing both your productivity and comprehension. Embrace a smarter, more accessible way to engage with content using TTSBuddy.
FAQs
Can I convert a scanned PDF?
Yes, you can convert a scanned PDF into audio using tools that combine Optical Character Recognition (OCR) and text-to-speech (TTS) technology. Here's how it works:
- OCR scans the PDF and extracts the text from its image-based content.
- TTS takes the extracted text and converts it into spoken audio.
To do this, upload your scanned PDF to a platform that supports OCR and TTS. Once the text is extracted, review it for accuracy, then generate an audio file for convenient listening. It's a seamless way to make text-heavy documents more accessible.
Will my document stay private?
When it comes to privacy, the tool you choose plays a big role. Some tools process your files directly on your device, keeping everything private and secure. Others might rely on cloud servers, which could involve storing or transmitting your data elsewhere. Always review the privacy features of the platform to know exactly how your documents are being managed.
How do I fix messed-up formatting?
To ensure a document converts smoothly into audio, it's important to tidy up the text first. Strip out elements like page numbers, headers, footers, and footnotes, as these can disrupt the flow of the audio. After cleaning up the text, paste it into your text-to-speech tool. From there, fine-tune settings like the voice and speed to make the audio sound more natural. A well-prepared document leads to clearer and more polished audio output.